Adding Filters and Search to FullCalendar events

In a previous article we learn how to make use of FullCalendar JavaScript framework to display calendar events.

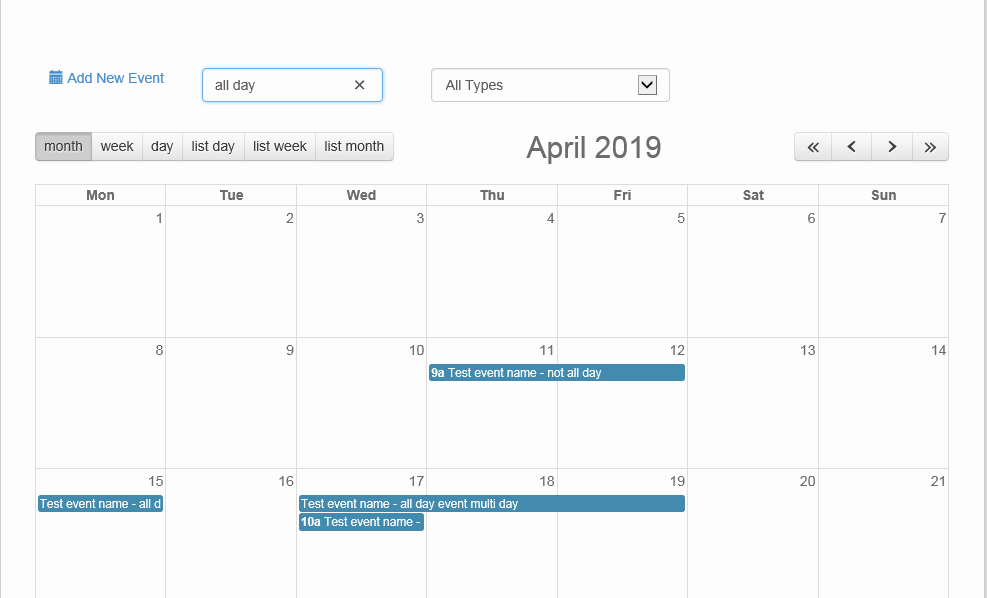
Now let’s step it a step further and the ability to filter and search for events. We will be filtering events base on their types, and search for events that contains the search terms in the event name and description. To achieve this goal, we will need to do the following:

  • Create a function to retrieve the event types
  • Create the calendar display page with filter selection and search box
  • Add the JavaScript to retrieve and render filtered events

Function to retrieve event types

Create a ColdFusion component events.cfc and inside this component add the following code which will retrieve the event types (we will assume you already have a table that stores the event types)

<cfcomponent>
  
  <cffunction name="getEvents" output="no" access="remote" returntype="any" returnformat="json">
    <cfscript>
      var q=new query();
      var results = [];
      var qResults = "";
      var dDiff = [];
      q.setDatasource(<your-event-ds>); 
      q.setSQL("
	SELECT events_id AS eventID, eventTitle AS title, 
        eventDesc AS [desc], startDate AS [start], endDate AS [end], 
        isAllDay, t.[name] AS type, eventURL AS url
	FROM events e
	INNER JOIN evTypes t on e.evType_id = t.evType_id
      ");
		 
      q.addParam(name="isApproved",value="true", CFSQLTYPE="CF_SQL_BIT");
      qResults=q.execute().getResult();
		
      for (var i=1; i<= qResults.RecordCount; i++) {
        event = {};
        event["id"] = qResults.eventID[i];
        event["title"] = qResults.title[i];
        event["desc"] = qResults.desc[i];
        event["type"] = qResults.type[i];
        event["url"] = qResults.url[i];
        event["start"] = '#LSDateFormat(qResults.start[i],"yyyy-mm-dd")#T#LSTimeFormat(qResults.start[i],"hh:mm:ss")#';		
        event["end"] = '#LSDateFormat(qResults.end[i],"yyyy-mm-dd")#T#LSTimeFormat(qResults.end[i],"HH:mm:ss")#';

        if (qResults.isAllDay[i] neq ""){
          event["allDay"] = iif(qResults.isAllDay[i] eq 1, DE("True"),DE("False"));
        }
        else {
          event["allDay"] = "False";
        }
        ArrayAppend(results,event);
      } //for
		
      return serializeJSON(results);
    </cfscript>
  </cffunction>
  
  <cffunction name="getEventTypes" output="no" access="public" returntype="query">
    <cfscript>
      var qGet = "";
      var qService = new query();
      var qResults = "";
			
      qService.setDatasource(<your-event-ds>);
      qService.setName("qGet");
      qService.setSQL("SELECT [name] FROM eventTypes WHERE isActive = 1 ORDER BY [name]");
      qResults = qService.execute().getResult();
      return qResults;			
    </cfscript>
  </cffunction>
</cfcomponent>

Create the calendar display with filters and search

Now let’s create the front-end calendar event display page. Create a new file called events.cfm and enter the following code:

<!doctype html>
<html>
<head>
<meta charset="utf-8">
<title>Calendar Events</title>
<link rel="stylesheet" href="/path/to/fullcalendar/3.9.0/fullcalendar.min.css" type="text/css" />
<link rel="stylesheet" href="/path/to/bootstrap/bootstrap-3.1.1//css/bootstrap.min.css" type="text/css" />
<script src="/path/to/fullcalendar/3.9.0/lib/moment.min.js"></script>
<script src="/path/to/jquery/jquery.min.js"></script>
<script src="/path/to/bootstrap/bootstrap-3.1.1/js/bootstrap.min.js"></script>
<script src="/path/to/fullcalendar/3.9.0/fullcalendar.min.js"></script>
<script src="/path/to/events.js"></script>
</head>
<body>

  <cfsilent>
    <cfscript>
      oEvents = createobject("component","#request.cfcPath#.events");
      qTypes = oEvents.getEventTypes();
    </cfscript>
  </cfsilent>

  <div class="container">
    <div class="row">
      <div class="col-md-12">
        <div id="filters">
          <form class="form-inline">
            <div class="col-md-3">
              <label class="sr-only" for="searchTerm">Search</label>
              <input type="text" id="searchTerm" name="searchTerm" class="form-control control-label" placeholder="Type search terms">
            </div>                        
            <div class="col-md-3">
              <select class="form-control filter" id="eventType" name="eventType">
                <option value='all'>All Types</option>
                <cfloop query="qTypes">
                <option value="#qTypes.name#">#qTypes.name#</option>
                </cfloop>
             </select>
            </div>
          </form>
        </div><!--- filters --->
      </div><!--- col --->
    </div><!--- row --->
    <div class="row">
      <div class="col-md-12">
        <div id="calendar"></div>
      </div>
    </div><!--- row --->
  </div><!--- container --->
</body>
</html>

Add JavaScript to retrieve and render filtered events

Let’s add the JavaScript that will retrieve and render the filtered events based on user inputs. Create a new JavaScript file called events.js and add the following code:

$( document ).ready(function(){
  $('#calendar').fullCalendar({
    firstDay: 1,
    fixedWeekCount: false,
    header: {
      left: 'month,agendaWeek,agendaDay',
      center: 'title',
      right: 'prevYear,prev,next,nextYear'
    },
    events: {
      url: '/events/calendar/show/events.cfc?method=getEvents&returnformat=json',
      type: 'POST',	
      error: function() {
        alert('there was an error while fetching events!');
      },
      success: function(res){
        console.log('success!');
      }
    }, //events
    eventRender: function eventRender( event, element, view ) {
      var showTypes, showFacilities, showSearchTerms = true;
      var types = $('#eventType').val();
      var searchTerms = $('#searchTerm').val();
			
      /* filters */
      if (searchTerms.length > 0){
        showSearchTerms = event.title.toLowerCase().indexOf(searchTerms) >= 0 || event.desc.toLowerCase().indexOf(searchTerms) >= 0;
      }
			
      if (types && types.length > 0) {				
        if (types.trim().toLowerCase() == "all") {
	  showTypes = true;
	} 
        else {
	  showTypes = types.indexOf(event.type) >= 0;
	}
      }
				
      return showTypes && showSearchTerms;					
    } //end: eventRender
  }); //calendar

  $('.filter').on('change',function(){
    $('#calendar').fullCalendar('rerenderEvents');
  });
	
  $('#searchTerm').on('input', function(){
    $('#calendar').fullCalendar('rerenderEvents');
  });

}); //document.ready

The calendar events will be re-rendered when a selection is made on the event type drop down or text entered in the search box, and will only display events that satisfy the filter inputs.

Using FullCalendarJS with a ColdFusion Application

To successfully make use of the FullCalendar JavaScript framework in a ColdFusion application do the following:

  • Create the component function that retrieve the calendar events from the database
  • Create the JavaScript that uses AJAX to retrieve the calendar events
  • Create the front-end html page where the calendar is rendered

1 Create the ColdFusion component function that retrieve the calendar events from the database

The secret to successfully retrieve the events from a database is the following:

  • Ensure the function’s return format is json
  • Convert the query into an array
  • Serialize the array to json before returning it

Here’s a sample code to illustrate (we will assume a new ColdFusion component named events.cfc is create):

<cfcomponent>
   <cffunction name="getEvents" output="no" access="remote" returntype="any" returnformat="json">
      <cfscript>
    	var q=new query();
        var results = [];
        var qResults = "";
        
        q.setDatasource(<the-datasource-name>); 
        q.setSQL("SELECT [event_id], [title], [start], [end], [isAllDay] FROM events");
        qResults=q.execute().getResult();        
        
        for (var i=1; i<= qResults.RecordCount; i++) {
	   event = {};
	   event["id"] = qResults.event_id[i];
	   event["title"] = qResults.title[i];			
	   event["start"] = '#LSDateFormat(qResults.start[i],"yyyy-mm-dd")#T#LSTimeFormat(qResults.start[i],"HH:mm:ss")#';			
	   event["end"] = '#LSDateFormat(qResults.end[i],"yyyy-mm-dd")#T#LSTimeFormat(qResults.end[i],"HH:mm:ss")#';
			
	   event["allDay"] = iif(qResults.isAllDay[i], DE("True"),DE("False"));			
	   ArrayAppend(results,event);
        } //for
        
        return serializeJSON(results);
      </cfscript>
   </cffunction>
</cfcomponent>

Please note that I have mirrored the Fullcalendar JS event attributes like title, start, end with the database table fields. If the table fields are different, then use AS in the SQL select statement to match it with the FullCalendar JS event attributes.

2 Create the JavaScript that uses AJAX to retrieve the calendar events

Create a new file call app.js and add the sample code below.

$( document ).ready(function(){
   //full calendar configs and data retrieval
   $('#calendar').fullCalendar({
      firstDay: 1,
      fixedWeekCount: false,			
      views: {
         listDay: { buttonText: 'list day' },
	 listWeek: { buttonText: 'list week' },
	 listMonth: { buttonText: 'list month' }
      },
      header: {
         left: 'month,agendaWeek,agendaDay,listDay,listWeek,listMonth',
	 center: 'title',
	 right: 'prevYear,prev,next,nextYear'
      },
      events: {
         url: '/path-to/events.cfc?method=getEvents&returnformat=json',
	 type: 'POST',	 
	 error: function() {
	    alert('there was an error while fetching events!');
	 }
      }, //events
   }); //calendar
}); //document.ready

3 Creating the front-end html page where the calendar is rendered

Create a new html file called events.html and in the header section add this code snippet:

<link rel="stylesheet" href="/path/to/fullcalendar/3.9.0/fullcalendar.min.css" type="text/css" />
<link rel="stylesheet" href="/path/to/bootstrap-3.1.1//css/bootstrap.min.css" type="text/css" />
<script src="/path/to/fullcalendar/3.9.0/lib/jquery.min.js"></script>
<script src="/path/to/bootstrap-3.1.1/js/bootstrap.min.js"></script>
<script src="/path/to/fullcalendar/3.9.0/lib/moment.min.js"></script>
<script src="/path/to/fullcalendar/3.9.0/fullcalendar.min.js"></script>
<script src="/path/to/app.js"></script>

In body of events.html, add this code snippet (please note we are using bootstrap for page layout and styling):

<body>
   <div class="container">
      <div class="row">
         <div class="col-md-12"><div id="calendar"></div></div>
      </div>
   </div>
</body>

The complete version for events.html is:

<!doctype html>
<html>
<head>
<meta charset="utf-8">
<cfheader name="X-UA-Compatible" value="IE=Edge" />
<title>Calendar Events</title>
<link rel="stylesheet" href="/path/to/fullcalendar/3.9.0/fullcalendar.min.css" type="text/css" />
<link rel="stylesheet" href="/path/to/bootstrap-3.1.1//css/bootstrap.min.css" type="text/css" />
<script src="/path/to/fullcalendar/3.9.0/lib/jquery.min.js"></script>
<script src="/path/to/bootstrap-3.1.1/js/bootstrap.min.js"></script>
<script src="/path/to/fullcalendar/3.9.0/lib/moment.min.js"></script>
<script src="/path/to/fullcalendar/3.9.0/fullcalendar.min.js"></script>
<script src="/path/to/app.js"></script>
</head>
<body>
   <div class="container">
      <div class="row">
         <div class="col-md-12"><div id="calendar"></div></div>
      </div>
   </div>
</body>
</html>

This is the resulting page if there are no errors.

Please note that you will need to enter some events into your database to see it on the calendar. Also note that events on your calendar may be different from the image below.

Related Selects with jQuery AJAX Post in ColdBox

Let’s create a related select form elements using jQuery AJAX post in ColdBox in this quick tip. That is, the available drop down values that are shown in the second select element is dependent on the user selection of the first select element.

We will be working with  the following technologies:

  • jQuery 1.x
  • ColdBox 4.2.x
  • ColdFusion 10

We will assume the following data model and relationship (simplified for this article):

  • Models
    • facility (id,name)
    • department (id,name)
  • Relationship
    • a facility has many departments

Let’s create the methods that we will need in the handler, and save it as handlers\reports.cfc.


component {
  property name="reportService" inject="model";
  property name="facilityService" inject="model";
  property name="departmentService" inject="model";

  public void function submit(event){
    var rc = event.getCollection();
    
    //retrieve list of facilities
    rc.facilities = facilityService.list(asQuery=false);
  }//submit

  public void function getAllDepartments(event) {
    //this method retrieves the data that will be return in JSON format to the front end
    //must be an array before converting to JSON format

    var rc = event.getCollection();
    var cr = "";
    var departments = [];

    //retrieve list of departments based on selected facility
    cr = departmentService.newCriteria();
    cr.createAlias('facilities','f');
    cr.add(cr.restrictions.isEq("f.facilityID",javacast("int",rc.id)));
    rc.departments = cr.list(asQuery=false);

    if( !isNull(rc.departments) && ArrayLen(rc.departments) ){
      for (var i=1; i lte ArrayLen(rc.departments); i++){
        departments[i] = {};
        departments[i].id = rc.departments[i].getDepartmentID();
        departments[i].name = rc.departments[i].getName();
      }//for
    }//if

    event.renderData(type="JSON",data=departments,nolayout=true);
  }//getAllDepartments

}//component

Please note that values must be stored in an array before calling the renderData method with type of JSON.

In the report model’s view where the facility and department select drop downs are used,  add the following code for views/reports/submit.cfm:


<form id="frmReport" class="form-horizontal" method="post" action="#event.buildLink('reports.save')#">
  <div class="form-group required">
    <label for="facility" class="col-md-4 control-label">Facility</label>
    <div class="col-md-3">
      <select name="facility" id="facility" class="form-control">
        <option value="">Please select...</option>
        <cfloop array="#rc.facilities#" index="facility">
        <option value="#facility.getFacilityID()#">#facility.getName()#</option>
        </cfloop>
      </select>
    </div>
  </div>

  <div class="form-group required">
    <label for="department" class="col-md-4 control-label">Department</label>
    <div class="col-md-3">
      <select name="department" class="form-control" id="department">
      <option value="" selected>Please select...</option>
      </select>
    </div>
  </div>
</form>

Important:
You must add the form attributes enctype=”multipart/form-data” if you want to pass multiple form values to your handler method via AJAX. For example:


<form id="formID" class="form-horizontal" method="post" action="#event.buildLink("reports.save")#" enctype="multipart/form-data">

  //your form elements here ....

</form>

<script>
$(document).ready(function(){
   $.ajax({
      url: '<cfoutput>#event.buildLink("reports.getDepartmensList")#</cfoutput>,
      type: 'post',
      data: {var1: var1Value, var2: val2Value, var3: var3Value},
      dataType: 'json'
      success: function(data){
         // do your stuff here on success ajax call return
      },
      error: function(xhr,textStatus,errorThrown){
         //handle the error on ajax error
      }
   }); //$.ajax

}); //document.ready
</script>

Finally, at the bottom of submit.cfm, add the JavaScript that will populate second select drop down list base on user selection from the facility drop down (first select).


<script>
$(document).ready(function() {
   $('#facility').change(function(){
      var $selectedFacilityID = $(this).val();
      if($selectedFacilityID.length > 0){
         $.ajax({
            url:'<cfoutput>#event.buildLink("reports.getDepartmentsList")#</cfoutput>/id/' + $selectedFacilityID,
            type: 'post',
            dataType: 'json',
            success: function(data){
               //id: data[i].ID
               //name: data[i].NAME
               //clear all options to start with
               $('#department').find('option').not(':first').remove();
               if (data.length > 0){            
                 //populate the departments drop down with returned values
                 for (i=0; i < data.length; i++){
                    $('#department').append('<option value="' + data[i].ID + '">' + data[i].NAME + '</option>');
                 } //for
               }//if
            },
            error : function(xhr,textStatus,errorThrown){
               console.log(xhr);
               console.log(textStatus);
               console.log(errorThrown);
            }
         }); //ajax post - getDepartmentsList
      } //if $selectedFacilityID.length
   }); //facility
}
</script>

We call the getDepartmentsList method using jQuery AJAX post and passing in the selected facility’s id to return its departments.

data is a variable used to store the  data from a successful AJAX post. This variable name can be changed. For example, sometimes it is called results. Use do notation to access the columns, and a for loop to loop through the returned records.

A Better Multi-Select with Chosen jQuery Plugin in ColdBox

Let’s improve the user experience for selecting multiple items in a select drop down list by using the chosen jQuery plugin. In this guide we will use the example of selecting multiple suppliers for a product in a ColdBox 4.2.x web application.

Follow these steps to setup the plugin, the entities, and finally making use of the plugin with the select element:

  • Download the chosen jQuery Plugin
  • The entities used
  • Create a new method to retrieve list of ID for select drop down
  • In edit handlers, retrieve list of values for select drop down
  • Import the chosen jQuery plugin scripts and styles
  • Define the select drop down list
  • Use the chosen jQuery plugin

Download the chosen jQuery Plugin

Head over to https://harvesthq.github.io/chosen/ to download the chosen jQuery plugin and save it to a location of your choice on the web server.

The Entities Used

Let’s define the entities used in this guide.

Product Entity


component persistent="true" table="products" {
   property name="productID" fieldtype="id" generator="identity" setter="false";
   property name="name" sqltype="nvarchar" length="150";

   property name="suppliers" fieldtype="many-to-many" cfc="models.suppliers.Supplier" singularname="supplier" fkcolumn="productID" inversejoincolumn="supplierID" linktable="products_suppliers";

}

Supplier Entity


component persistent="true" table="suppliers" {
   property name="supplierID" fieldtype="id" generator="identity" setter="false";
   property name="name" sqltype="nvarchar" length="50";
}

Create new method to retrieve list of ID for select drop down

In the product entity (e.g. models\products.cfc), create a new method to retrieve list of ID for the select drop down list. In this example, we are retrieving the list of suppliers ID for a product. A product has many suppliers. In models\products\Product.cfc add the following code:


public string function getSuppliersIDList() {
   var suppliers = "";
   for ( var i=1; i<=arrayLen(getSuppliers()); ++i ) {
      suppliers = listAppend(suppliers,getSuppliers()[i].getSupplierID());
   }
   return suppliers;
}

Retrieve list of values for select drop down

In the products edit handler (handlers\Products.cfc), we need to retrieve the list of suppliers for populating the select drop down:


component {
   property name="productService" inject="model";
   property name="supplierService" inject="model";

   public void function edit(event){
      var rc = event.getCollection();
      event.paramValue("id","");
      rc.product = productService.get( rc.id );
      rc.suppliers = supplierService.list(sortOrder="name",asQuery=false);
   } //edit
} //component

Import the chosen jQuery Plugin scripts and styles

In the default Main layout (e.g. layouts\Main.cfm), add the following to import the chosen jQuery plugin scripts and styles:


<cfoutput>
   #html.doctype()#
   <html lang="en">
   <head>
   <meta http-equiv="X-UA-Compatible" content="IE=Edge">
   <meta charset="utf-8">
   <title>#getSetting('appName')#</title>
   <meta name="viewport" content="width=device-width, initial-scale=1">
   <link href="/path/to/bootstrap.min.css" rel="stylesheet" type="text/css"/ >
   <link rel="stylesheet" href="/path/to/chosen.css" type="text/css"/ >
   </head>
   <body>
      <script src="/path/to/jquery.min.js"></script>
      <script src="/path/to/bootstrap.min.js"></script>
      <script src="/path/to/chosen.jquery.js" type="text/javascript"></script>
   </body>
   </html>
</cfoutput>

Define the select drop down

Edit views\products\edit.cfm and add the following:


<div class="form-group">
   <label for="suppliers" class="col-md-2 control-label">Suppliers &nbsp;</label>
   <div class="col-md-4">
      <select data-placeholder="Click or type to choose suppliers ..."
         name="suppliers" class="chosen-select form-control" multiple="multiple">
         <option value="">&nbsp;</option>
         <cfloop array="#rc.suppliers#" index="supplier">
            <option value="#supplier.getSupplierID()#">#supplier.getName()#</option>
         </cfloop>
      </select>
   </div>
</div>

Ensure the following is added on the select form element:

  • data-placeholder
  • class=”chosen=selelct”
  • multiple=”multiple”

Use the chosen jQuery Plugin

In the same edit view, i.e. views\products\edit.cfm, towards the bottom of the file before the closing body tag, add:


<script>
   <cfoutput>
   //retrieve selected ID for pre-population
   var #toScript(rc.product.getSuppliersIDList(),'lSuppliersID')#;
   var aSuppliersID = lSuppliersID.split(',');
   </cfoutput>

   $(document).ready(function() {
      //use chosenJS for multi select
      $('.chosen-select').chosen({width:'100%'});

      if (lSuppliersID != ''){
         //pre-populate selected supplier for edits
         $('.chosen-select').val(aSuppliersID).trigger('chosen:updated');
      }
   });
</script>

In lines 3-5, we retrieve the list of supplier ID for pre-populating a form when editing (i.e. the suppliers were already selected), and then on line 14 we must trigger an update to add the selected value to the multi-select box. On line 10 we activate the chosen jQuery plugin

You should see something like these if the chosen jQuery plugin is working as expected:

Populating a Related Select Using jQuery in ColdFusion

In this quick tip we will use jQuery to populate a related select html form element in ColdFusion. The first select element will show a list of states, and the second will show a list of cities based on the selected state.

We will assume that you have a database with tables that holds the state and city information, that the files contacts.cfc and addClients.cfm are saved in the same file folder, and request.dsn is defined in Application.cfc.

Here’s what we need to do:

  • Create queries to retrieve list of states and cities
  • Create a simple form with two related select
  • Use jQuery to populate the related select

1. Create queries to retrieve list of states and cities.

Let’s create a ColdFusion component and name it contacts.cfc. In this component, add the following code fragments:


<cfcomponent>
   <cffunction name="getStates" returntype="query" hint="Get list of states">
      <cfscript>var qGet = "";</cfscript>
      <cfquery name="qGet" datasource="#request.dsn#">
         SELECT stateID, stateName
         FROM states
      </cfquery>
   </cffunction>

   <cffunction name="getCities" output="false" returntype="array" hint="Get cities for a given state">
   <cfargument name="stateID" type="string" required="yes" default="0">
      <cfscript>
         var qGet = "";
         var aCities = [];
      </cfscript>

      <cfquery name="qGet" datasource="#request.dsn#">
         SELECT c.cityID, c.cityName
         FROM cities c
         INNER JOIN states s ON s.stateID = c.FK_stateID
         WHERE c.FK_stateID = <cfqueryparam cfsqltype="cf_sql_integer" value="#arguments.stateID#">
      </cfquery>

      <cfscript>
         //convert query to array
         var cols = qGet.columnList;
         var colsLen = listLen(cols);
         for(var i=1; i<=qGet.recordCount; i++) {
            var row = {};
            for(var k=1; k<=colsLen; k++) {
               row[lcase(listGetAt(cols, k))] = qGet[listGetAt(cols, k)][i];
            } //for k
            arrayAppend(aCities, row);
         } //for i

         return aCities;
      </cfscript>
   </cffunction>
</cfcomponent>

2. Create a simple form with two related select

Let’s a create form to add a client, and name it addClient.cfm. In this file, add the following code fragments:

<!DOCTYPE html>
<html>
<head>
   <meta charset="UTF-8">
   <title>Add Client</title>
   <link href="/path/to/jquery.min.css" rel="stylesheet" type="text/css" />
   <link href="/path/to/bootstrap.min.css" rel="stylesheet" type="text/css"/ >
</head>
<body>
   <script src="/path/to/jquery.min.js"></script>
   <script src="/path/to/bootstrap.min.js"></script>
   <cfscript>
      //retrieve list of states from db
      oContact = createobject("component","contacts");
      states= oContact.getStates();
   </cfscript>

   <cfoutput>
      <form name="addClient" class="form-horizontal" method="post" action="">
         <div class="form-group required">
            <label for="state" class="col-md-4 control-label">State &nbsp;</label>
            <div class="col-md-7">
               <select name="state" id="state" class="form-control">
                  <option value="">&nbsp;</option>
                  <cfloop query="states">
                  <option value="#states.stateID#">#states.stateName#</option>
                  </cfloop>
               </select>
            </div>
         </div>
         <div class="form-group required">
            <label for="city" class="col-md-4 control-label">City &nbsp;</label>
            <div class="col-md-7">
               <!--- the 'city' select will be populated by jQuery when a state is selected --->
               <select name="city" id="city" class="form-control">
                  <option value="">&nbsp;</option>
               </select>
            </div>
         </div>
      </form>
   </cfoutput>

3. Use jQuery to populate the related select

In addClient.cfm, just after the closing form tag, add the following code fragment:


<script>
$(document).ready(function() {
   $('#state').on('change', function(){ 
      var $selStateID = $(this).val();
      //use jQuery ajax call to retrieve list of cities based on selected state
      $.ajax({ 
         method: 'post', 
         dataType: 'json', 
         url: 'contacts.cfc', 
         data: { 
            method: 'getCities', 
            returnFormat: 'json', 
            stateID: $selStateID 
         }, 
         success: 
            function(results,status,xhr){ 
               var $citySelect = $('#city'); 

               //clear all options value except the first one
               $citySelect.find('option:not(:first)').remove(); 

               //if we have cities returned from ajax call, the create options for cities select
               if (results.length){ 
                  $.each (results, function(i){ 
                     $citySelect.append('<option value="' + results[i].cityid + '">' + results[i].cityname + '</option>'); 
                  }); //each 
               } //if 
          } //success 
       }); //$.ajax 
     }); // state.onchange 
   });//document 
   </script> 
</body> 
</html>

Important notes:

For the above jQuery ajax retrieval to work, please ensure the following:

  • dataType must be json,
  • returnFormat must be json, and
  • query to retrieve list of cities must be converted to an array (do not return a query)

The stateID is passed to the function to retrieve all cities with the selected state. The jQuery ajax post happens when the user selects a state from the first select drop down list. $selStateID represent the ID of the selected state.

When a list of cities is returned from the jQuery ajax post, we then populate the cities select drop down list with this return set of values. cityid and cityname are fields in the cities table.


How to export to csv, pdf and more using DataTables

Ever wanted to easily export tabular data as csv, pdf, Excel in addition to copying and printing them with just a click in a ColdBox or any web applications and sites? Well, you can by using jQuery and DataTables, and it is as easy as 1-2-3:

  1. Link to the libraries
  2. Initialise the table and buttons
  3. Test the buttons

Link to the Libraries

In the html page head add the following styles for the DataTables table and buttons:


<head>
   <link rel="stylesheet" type="text/css" href="https://cdn.datatables.net/1.10.12/css/jquery.dataTables.min.css">
   <link rel="stylesheet" type="text/css" href="https://cdn.datatables.net/buttons/1.2.2/css/buttons.dataTables.min.css">
</head>

And in the body, link to the libraries:


<body>
   <script src="https://code.jquery.com/jquery-1.12.3.js"></script>
   <script src="https://cdn.datatables.net/1.10.12/js/jquery.dataTables.min.js"></script>
   <script src="https://cdn.datatables.net/buttons/1.2.2/js/dataTables.buttons.min.js"></script>
   <script src="https://cdn.datatables.net/buttons/1.2.2/js/buttons.flash.min.js"></script>
   <script src="https://cdnjs.cloudflare.com/ajax/libs/jszip/2.5.0/jszip.min.js"></script>
   <script src="https://cdn.rawgit.com/bpampuch/pdfmake/0.1.18/build/pdfmake.min.js"></script>
   <script src="https://cdn.rawgit.com/bpampuch/pdfmake/0.1.18/build/vfs_fonts.js"></script>
   <script src="https://cdn.datatables.net/buttons/1.2.2/js/buttons.html5.min.js"></script>
   <script src="https://cdn.datatables.net/buttons/1.2.2/js/buttons.print.min.js"></script>
</body>

Initialise the table and buttons

To initialise the table with an id of summary, and add the buttons (copy,csv,excel,pdf,print), add this JavaScript snippet towards the button of the page:


<script>
$(document).ready(function() {
   $('#summary').dataTable({
      dom: 'Bfrtip',
         lengthMenu: [
            [ 10, 25, 50, 100, -1 ],
            [ '10 rows', '25 rows', '50 rows', '100 rows', 'Show all' ]
         ],
         buttons: [
            'pageLength',
            'copy',
            {
               extend: 'csv',
               title: 'Summary'
            },
            {
               extend: 'excel',
               title: 'Summary'
            },
            {
               extend: 'pdf',
               title: 'Summary'
            },
            'print'
         ]
   });
});
</script>

Notes

  • lengthMenu in combination with pageLength – rows per page to display options – i.e. 10,20,50,100 per page etc
  • extend and title allow us to specify the title to use for display and file name for the csv, Excel and pdf buttons
  • dom parameters (turn on/off – present means it’s on):
    • B – buttons
    • f – filtering input
    • r – processing display element
    • t – The table!
    • i – Table information summary
    • p – pagination control

Test the buttons

Test each of the following buttons:

  • Copy
  • CSV
  • Excel
  • PDF
  • Print

Here’s what you should see if you click the Copy button:

csv-pdf-datatables-2a

Date field validation with constraints and formvalidationJS in ColdBox

When developing web forms or applications, server and client side user input validations should be on every developers’ mind. In this quick guide we will provide a simple code example to illustrate how we can use ColdBox’s domain model constraint on the server side, and formvalidationJS and momentJS on the client side to perform some basic date field validations.

Firstly, let’s tackle server side validation using domain model constraints in ColdBox. Let’s create the Coldbox domain model for clients and add the constraints for the date of birth (dob) field:


component persistent="true" extends="BaseEntity" table="clients" {
  property name="client_id" fieldtype="id" generator="identity" setter="false";
  property name="title" sqltype="nvarchar" length="10";
  property name="firstname" sqltype="nvarchar" length="100";
  property name="lastname" sqltype="nvarchar" length="100";
  property name="dob" ormtype="date";
  property name="gender" sqltype="nvarchar" length="6";

  //validations
  this.constraints = {
    firstname = {required=true, requiredMessage="First Name is required"},
    lastname = {required=true, requiredMessage="Last Name is required"},
    gender = {required=true, requiredMessage="Gender is required"},
    dob = {
      required=true, requiredMessage="DOB is required",
      type="date", typeMessage="DOB must be a valid date",
      discrete="lte:#now()#", discreteMessage="DOB cannot be in the future"}
   } //constraints
}

The dob field has three constraints: required, type and discrete. That is, dob is required, has to be of type date and cannot be a date that is in the future. We are adding a custom message when the constraint fails. To add your own custom messages for specific constraints, use this constraint message convention:

{constraintName}Message = "My Custom Message";

So in our code above, we have the following custom messages for the constraints of required, type, and discrete:

  • requiredMessage=”DOB is required”
  • typeMessage=”DOB must be a valid date”
  • discreteMessage=”DOB cannot be in the future”

For more information on constraints, head over to the ColdBox wiki validation page.

Let’s test the dob field constraints before we add the client side validations. Here’s the error message if you select a future date for the dob field and submitted the update:

dob-model-future-constraint-error

Now let’s add client side validations for the dob field. We will need to do the following:

  • Add references to formvalidationJS and momentJS in the Main layout (layouts/Main.cfm)
  • In the view page where the dob field is used, we will need to add the necessary script to validate it using formvalidationJS and momentJS

In the head and body of layouts/Main.cfm, add the following to reference the required JavaScript libaries and frameworks:


<head>
<link href="/path/to/bootstrap/css/bootstrap.min.css" rel="stylesheet" type="text/css"/ >
<link href="/path/to/bootstrap/bootstrap-dialog.min.css" rel="stylesheet" type="text/css" />
<link href="/path/to/bootstrap/formvalidation/css/formValidation.min.css" rel="stylesheet" />
<link href="/path/to/bootstrap/bootstrap-datepicker/css/bootstrap-datepicker.min.css" rel="stylesheet" />
<link href="/path/to/bootstrap/bootstrap-datepicker/css/bootstrap-datepicker3.min.css" rel="stylesheet" />
</head>
<body>

<script src="/path/to/jquery/jquery.min.js"></script>
<script src="/path/to/bootstrap/js/bootstrap.min.js"></script>
<script src="/path/to/bootstrap/formvalidation/js/formValidation.min.js"></script>
<script src="/path/to/bootstrap/formvalidation/js/framework/bootstrap.min.js"></script>
<script src="/path/to/bootstrap/bootstrap-datepicker/js/bootstrap-datepicker.min.js"></script>
<script src="/path/to/moment.js"></script>

</body>

Then in the add/edit view page (i.e. edit.cfm) for the client domain model, towards the bottom of the page, add the part in the script section to perform client side validation using formvalidationJS and momentJS:


<form class="form-horizontal" role="form" id="frmClientEdit" method="post" action="#event.buildLink('clients.save')#">
 <div class="form-group required">
   <label for="dob" class="col-md-3 control-label">DOB &nbsp;</label>
   <div class="col-md-2 date">
    <div class="input-group input-append date" id="dpDOB">
     <input type="text" class="form-control" name="dob"  value="#dateFormat(rc.client.getDOB(), 'dd/mm/yyyy')#" placeholder="dd/mm/yyyy"/>
     <span class="input-group-addon add-on"><span class="glyphicon glyphicon-calendar"></span></span>
    </div>
   </div>
 </div>
</form>

<script>
$(document).ready(function() {
  $('#dpDOB').datepicker({
        format: 'dd/mm/yyyy'
  })
  .on('changeDate', function(e) {
        // Revalidate the dob field
        $('#frmClientEdit').formValidation('revalidateField', 'dob');
  });
  $('#frmClientEdit').formValidation({
    framework: 'bootstrap',
      icon: {
      valid: 'glyphicon glyphicon-ok',
      invalid: 'glyphicon glyphicon-remove',
      validating: 'glyphicon glyphicon-refresh'
    },
    fields: {
      dob: {
        validators: {
          notEmpty: {
            message: 'DOB is required and cannot be empty'
          },
          date: {
            message: 'The value is not a valid date',
            format: 'DD/MM/YYYY'
          },
          callback: {
            message: 'This date is in the future and invalid',
            callback: function(value, validator) {
              var m = new moment(value, 'DD/MM/YYYY', true);
              var now = moment();
              if (!m.isValid()) {
                return false;
              }
              return m.isBefore(now);
           } //callback
         } //validators
       } //dob
     }//fields
   }); //formvalidation
}); //document

To ensure that dob is not a date in the future, we use formvaliationJScallback feature in conjunction with momentJS. We compare the selected date value with current date and time. If it is greater, an error message is displayed to alert the user.

We’ve also add the re-validation for the dob field so that formvalidationJS re-validate this field when users clicks the calendar to re-select the dob. The result for validation when it fails and succeeds are:

dob-client-side-future-date-error-1

dob-client-side-future-date-error-2

Bootstrap DatePicker Re-validation

Formvalidation is a really handy framework for client side form field validations (including inputs using a date picker) and integrates nicely with popular front-end frameworks such as BootStrap, Foundation, SemantUI, Pure and UIKit. If you’re struggling with re-validating a datepicker after the value changes, then here’s a quick note on how to ensure that date value is re-validated.

Here are the steps for setting a client side form which use BootStrap, Formvalidation to validate and re-validate a datepicker. Please note that BootStrap also needs jQuery:

  1. Setup the form skeleton
  2. Link to the required stylesheets use by BootStrap, jQuery and Formvalidation
  3. Link to the JavaScript files for jQuery, BootStrap and Formvalidation
  4. Create a simple BootStrap form
  5. Add BootStrap DatePicker validation using the Formvalidation framework
  6. Add BootStrap DatePicker re-validation

Setup the form skeleton

<!DOCTYPE html>
<html lang="en">
<head>
   <meta charset="utf-8">
   <title>BootStrap DatePicker Re-validation</title>
</head>
<body>

</body>
</html>

Link the required stylesheets use by BootStrap, jQuery and Formvalidation

Underneath the title tag, add the following to link to the required stylesheets for BootStrap, Formvalidation and BootStrap DatePicker frameworks. The head section should now look like this after adding links to the stylesheets:

<head>
    <meta charset="utf-8">
    <title>BootStrap Datepicker Re-validation</title>
    <link href="/path/to/bootstrap.min.css" rel="stylesheet" type="text/css" >
    <link href="/path/to/formValidation.min.css" rel="stylesheet">
    <link href="/path/to/bootstrap-datepicker.min.css" rel="stylesheet">
    <link href="/path/to/bootstrap-datepicker3.min.css" rel="stylesheet">
</head>

Link to the JavaScript files for jQuery, BootStrap, DatePicker and Formvalidation

Under the h1 tag, add the required JavaScript files for the jQuery, BootStrap, Formvalidation (including the BootStrap js file in the frameworks folder of Formvalidation), and BootStrap DatePicker. jQuery is a required framework for BootStrap. You should now have this:

<body>
    <h1>BootStrap DatePicker re-validation</h1>
    <script src="/path/to/jquery.min.js"></script>
    <script src="/path/to/bootstrap.min.js"></script>    
    <script src="/path/to/formValidation.min.js"></script>
    <script src="/path/to/formvalidation/framework/bootstrap.min.js"></script>
    <script src="/path/to/bootstrap-datepicker.min.js"></script>

Create a simple BootStrap form

After the final script tag, add the form and its elements. We will just create a simple form with three input fields – first name, last name and date of birth (dob). Here’s the completed form using BootStrap:

<body>
    <h1>BootStrap DatePicker re-validation</h1>
    <script src="/path/to/jquery.min.js"></script>
    <script src="/path/to/bootstrap.min.js"></script>    
    <script src="/path/to/formValidation.min.js"></script>
    <script src="/path/to/formvalidation/framework/bootstrap.min.js"></script>
    <script src="/path/to/bootstrap-datepicker.min.js"></script>
    <form class="form-horizontal" role="form" id="frmClientEdit" method="post" action="">
       <div class="form-group required">
	   <label for="firstname" class="col-md-3 control-label">First Name</label>
           <div class="col-md-3">                            
	      <input type="text" name="firstname" class="form-control">
	   </div>
	</div>
        <div class="form-group required">
	   <label for="lastname" class="col-md-3 control-label">Last Name</label>
           <div class="col-md-3">                            
	      <input type="text" name="lastname" class="form-control">
	   </div>
	</div>
        <div class="form-group required">
	   <label for="dob" class="col-md-3 control-label">DOB</label>
           <div class="col-md-2 date">
              <div class="input-group input-append date" id="dpDOB">
		   <input type="text" class="form-control" name="dob" placeholder="dd/mm/yyyy"/>
		   <span class="input-group-addon add-on"><span class="glyphicon glyphicon-calendar"></span></span>
	      </div>
	   </div>
	</div>
        <div class="form-group">
           <div class="col-md-3 col-md-offset-3">
		<button type="button" class="btn btn-default" onClick="location.href=''">Cancel</button>                        
		<button type="submit" class="btn btn-primary">Save</button>
	    </div>
	</div>
   </form>
</body>

Add BootStrap DatePicker validation using the Formvalidation framework

Just after the closing form tag, add the following to perform simple client side form validation (including the BootStrap DatePicker) using the Formvalidation framework:

<script>
$(document).ready(function() {			
  $('#frmClientEdit').formValidation({
    framework: 'bootstrap',	
    icon: {
	valid: 'glyphicon glyphicon-ok',
	invalid: 'glyphicon glyphicon-remove',
	validating: 'glyphicon glyphicon-refresh'
    },	
    fields: {								
	firstname: {
	   validators: {
	      notEmpty: {
	         message: 'First Name is required and cannot be empty'
	      }
	   }
	},//firstname
	lastname: {
	   validators: {
	      notEmpty: {
	         message: 'Last Name is required and cannot be empty'
	      }
	   }
	},//lastname		
	dob: {
	    validators: {
	       notEmpty: {
		  message: 'DOB is required and cannot be empty'
	       },
	       date: {
		  message: 'The value is not a valid date',
		  format: 'DD/MM/YYYY'
	       }
	    }
	},//dob						
    }//fields
  });			
});
</script>

Add BootStrap DatePicker re-validation

Just after the closing form tag, add the following (after $(document).ready(function() {) to perform a re-validation using the Formvalidation framework for the dob BootStrap DatePicker:

   $('#dpDOB').datepicker({
	format: 'dd/mm/yyyy'
   })
   .on('changeDate', function(e) {
   // Revalidate the date field
      $('#frmClientEdit').formValidation('revalidateField', 'dob');
   });

That’s all there is to it. Remember, if you don’t add this last snippet, then the DOB datepicker won’t re-validate the date value if you pick (or type in) a different date.

Here’s what you will see if you click the Save button without entering any input:

datepicker-revalidation-1a

Let’s fix validation feedback icon positions. To do so, create a css file called app.css, and add the following:

#frmClientEdit .form-control-feedback {
top: 0;
right: -15px;
}

Then in the form file, add the following in the head section after the last link definition so that the new style definition in app.css is applied to the form to adjust the validation feedback icon position:

<link href="app.css" rel="stylesheet">

You should now see that the icon are to right of the form elements, i.e.

datepicker-revalidation-1

Here are some more screenshots client side form validations using the Formvalidation, BootStrap, jQuery and BootStrap DatePicker frameworks:

datepicker-revalidation-2

datepicker-revalidation-3

datepicker-revalidation-4